Moving products to Shopify or WooCommerce with a product CSV file
How Shopify and WooCommerce product CSV files work, with handles, variants and photo links, the import errors that catch sellers, bulk edits and the Merchant Center rules to keep.

On this page (9 sections)
Typing a hundred products into a new shop one by one takes days, and every typo stays there. A product CSV file lets you load them all at once, with sizes, colours, prices, stock and photos. This post shows you how Shopify's and WooCommerce's product files work, how to build one, the import errors that catch most sellers, how to edit a whole catalogue in bulk, and how to keep the same file within Google Merchant Center's rules.
The shop and products in the example are made up. Shopify and WooCommerce change their import formats from time to time, so compare your file with a fresh sample from their help pages. This post is not legal or tax advice.
How a Shopify product CSV works
Shopify's help page on using CSV files for products sets out the rules:
- Title is the only column a new product needs. If the product has variants, the URL handle is needed too. To update existing products, you need both.
- The handle is the product's unique name in the file and in its web address. It can have letters, numbers and dashes, but no spaces.
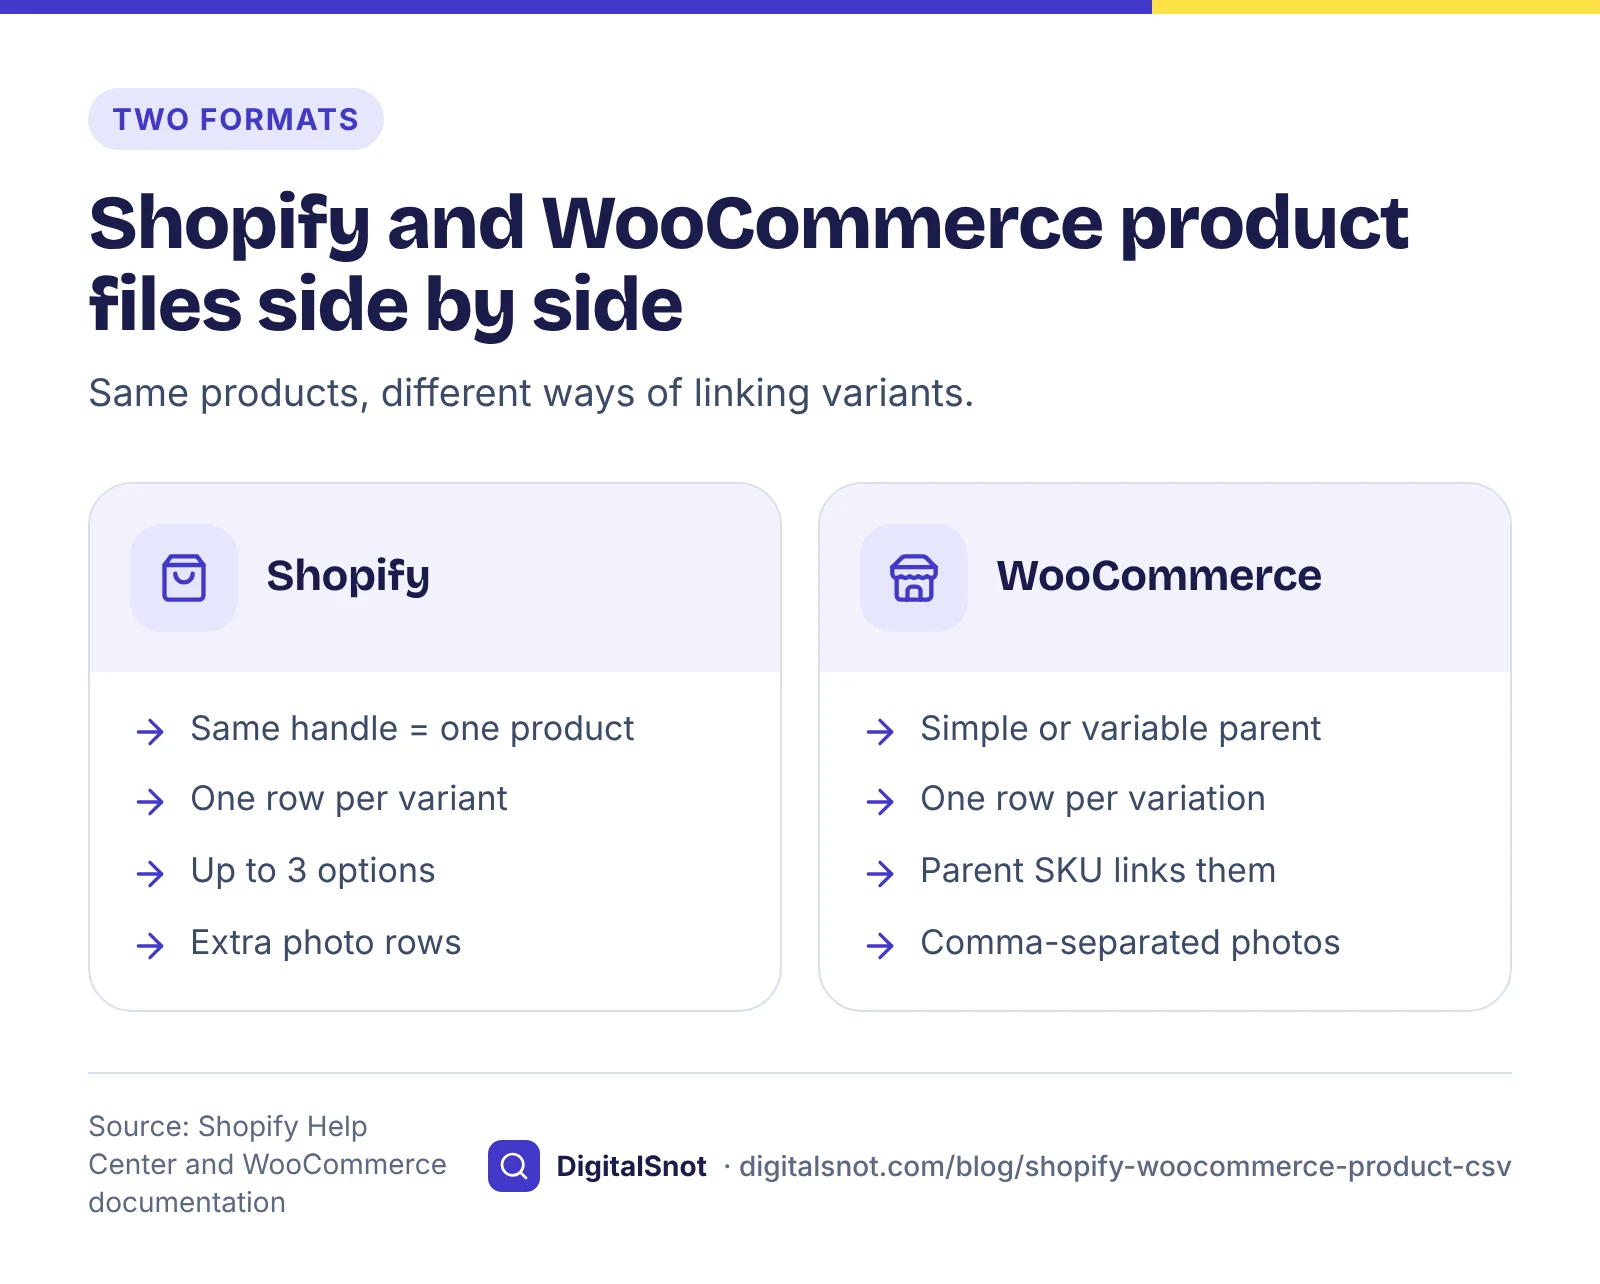
- Rows with the same handle are one product. The first row carries the product's details; each variant has its own row with its own SKU, price and stock.
- Up to 3 options, such as size, colour and material. Every combination of values is a variant. A product without options uses the value Default Title.
Column names have changed over time: older samples use names such as Variant SKU and Variant Price, while the current help page shows shorter names. Use the sample file from the page you import on. Shopify's import page says a product CSV can be at most 15 MB, and when a handle in the file matches one in your shop, you choose whether to overwrite that product or skip it.
Photos go in as links, not files. Shopify fetches each one during the import, so the link must open the image itself for anyone, without a password. A link to a cloud folder or a page that shows the photo is not enough.
How WooCommerce's importer works
WooCommerce has a built-in product importer, described in its CSV importer and exporter documentation, with the full column list in its product CSV import schema:
- A product without options is one row of type simple.
- A product with options is a parent row of type variable that lists every value of each attribute, such as "S, M, L", followed by one row of type variation per combination.
- Each variation needs its own unique SKU, one value for each attribute, and the parent's SKU in the Parent column (or its ID written as id:123).
- Images is a comma-separated list of links, and the first is the main photo. The images must already be online.
- Updating existing products matches them by ID or SKU.
WooCommerce's paid Product CSV Import Suite uses a different format, so do not mix the two.
A worked example: Mitti Tales Pottery
Mitti Tales Pottery in Khurja is a made-up shop moving its ceramics from a spreadsheet to Shopify. It has three products:
- A glazed mug in Indigo, Sage and Rust: one option, three variants.
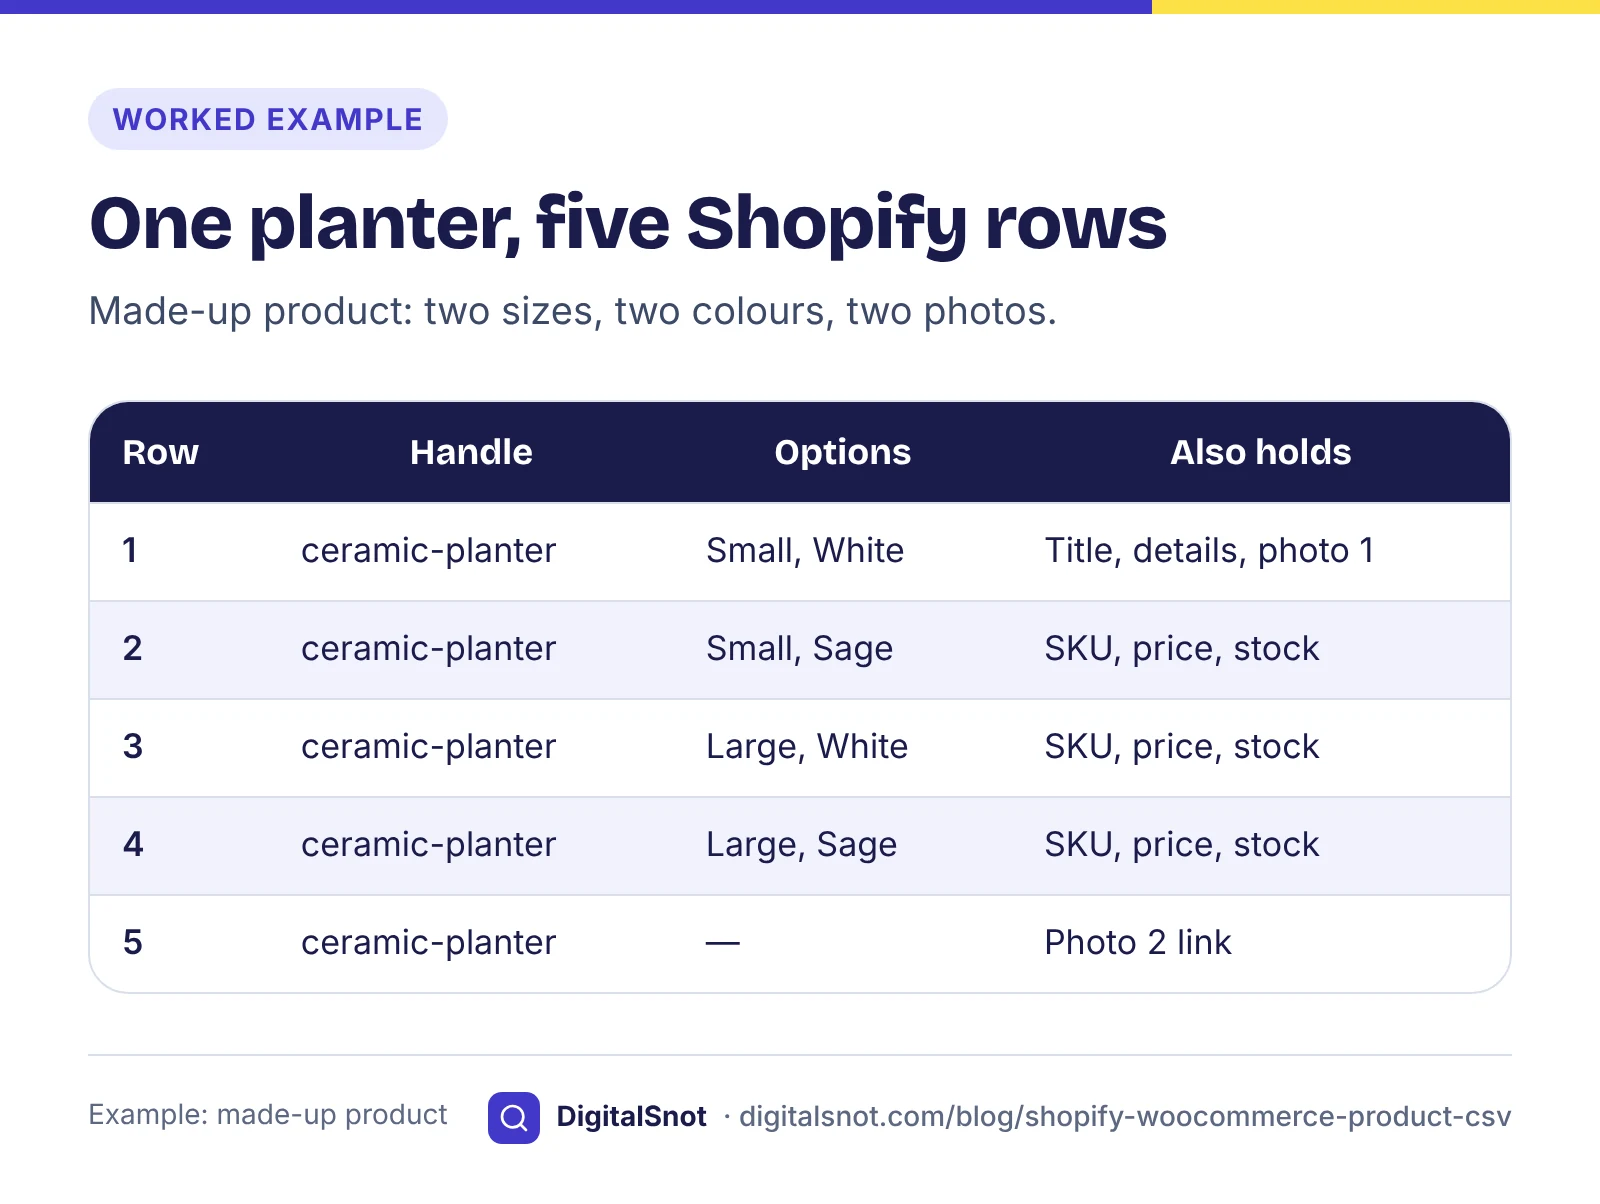
- A ceramic planter in Small and Large, each in White and Sage: two options, four variants.
- A serving bowl with no options.
The owner put them into the Product CSV Builder for Shopify and WooCommerce. You choose the platform, type each product with its price, MRP, SKU, stock, weight, category, tags, photo links and options, or paste a simple spreadsheet. The tool makes a variant for every combination, builds SKUs from a pattern such as MT-{product}-{colour}-{size}, so the large sage planter becomes MT-CP-SAGE-LARGE, and builds handles from the names. You can open a product's variants to change the price, stock or SKU of one of them.
For Shopify, the planter becomes four variant rows with the handle ceramic-planter, and one more row for its second photo. For WooCommerce, the same planter is one variable parent row and four variation rows. With an MRP above your price, the MRP goes in Shopify's compare-at price, which shows crossed out, and in WooCommerce's regular price, with your price as the sale price.
Before you download, the tool checks for repeated SKUs and handles, missing prices, an MRP below the price, photo links that are not https and weights without a unit. It runs in your browser and does not sign in to your shop: you import the file yourself. It does not fill Shopify's product category, barcodes, SEO fields or Merchant Center attributes, and it makes up to 100 variants per product.
Common import errors, and how to avoid them
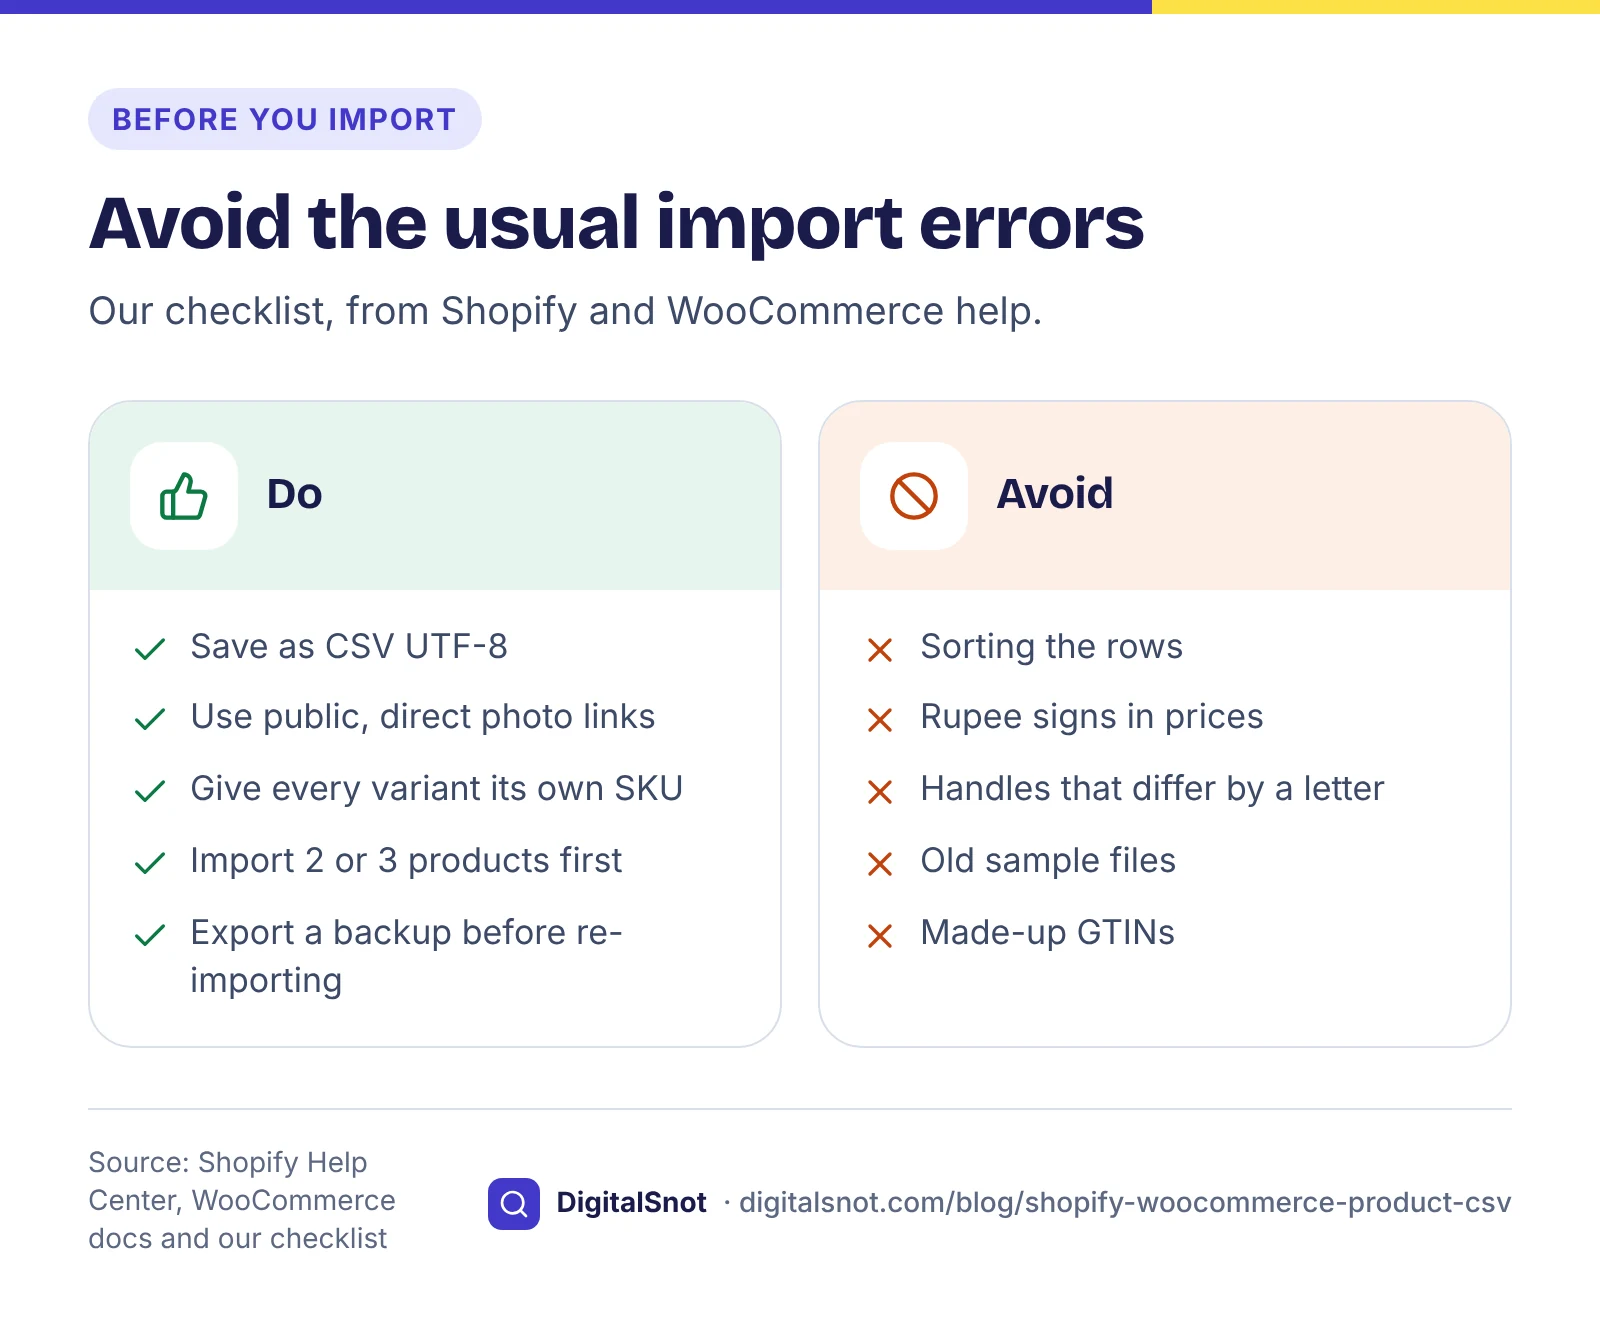
- Garbled rupee signs or Hindi text. Both platforms expect UTF-8. Shopify's common import issues page says unexpected characters usually mean the file is not UTF-8. Save or export it as "CSV UTF-8".
- Photos missing after the import. The link was not public, not a direct link to the image, or mistyped. Shopify skips a photo it cannot fetch, so open each product after the import.
- Variants split into separate products. The handle differs by one character between rows, or a WooCommerce variation's Parent does not match the parent's SKU exactly.
- Repeated SKUs. WooCommerce needs a unique SKU for each variation. Add size and colour to the SKU pattern.
- Prices with symbols. Write 1299, not ₹1,299.
- A re-sorted spreadsheet. Our advice: do not sort the rows. A product's variant and photo rows sit under its first row, and sorting by price or name can scatter them through the file. Keep the rows in the order the tool wrote them, and sort only a copy if you need to look at prices.
- Weights in the wrong unit. The Shopify file from our tool gives weights in grams; a WooCommerce file uses your store's weight unit.
WooCommerce's documentation suggests a trial import first, with one parent product and a few variations, and checking the result before the rest. Do the same in Shopify: import two or three products, open them in your shop, then import the rest.
Edit the whole catalogue in bulk
Once your products are in, you will want to change many at once: a brand name in every title, the words "free shipping" taken out of descriptions, or empty fields filled. The Bulk Catalogue Editor opens a Shopify or WooCommerce product export, a Merchant Center feed or any CSV of up to 5,000 rows. It matches the columns and checks every row for missing or repeated titles and SKUs, titles over 150 characters or in capitals, promotional words, prices that are not plain numbers, a crossed-out price that is not higher than the price, GTINs with a wrong check digit and image links that do not start with https://.
You then fix many rows at once: find and replace, add text, tidy spaces, fix capitals, remove promotional words, shorten titles at a word boundary or fill empty cells, on all rows or only the ones with an issue. Every edit can be undone, and the download keeps your columns in their order. It runs in your browser and nothing is uploaded.
Re-importing an edited export needs care. The tool's notes, drawn from Shopify's help, say Shopify clears values in blank columns on a re-import and makes new variant IDs when option values change. So keep the columns as they came out of the export, and try a few products first.
Keep Merchant Center's rules in the same file
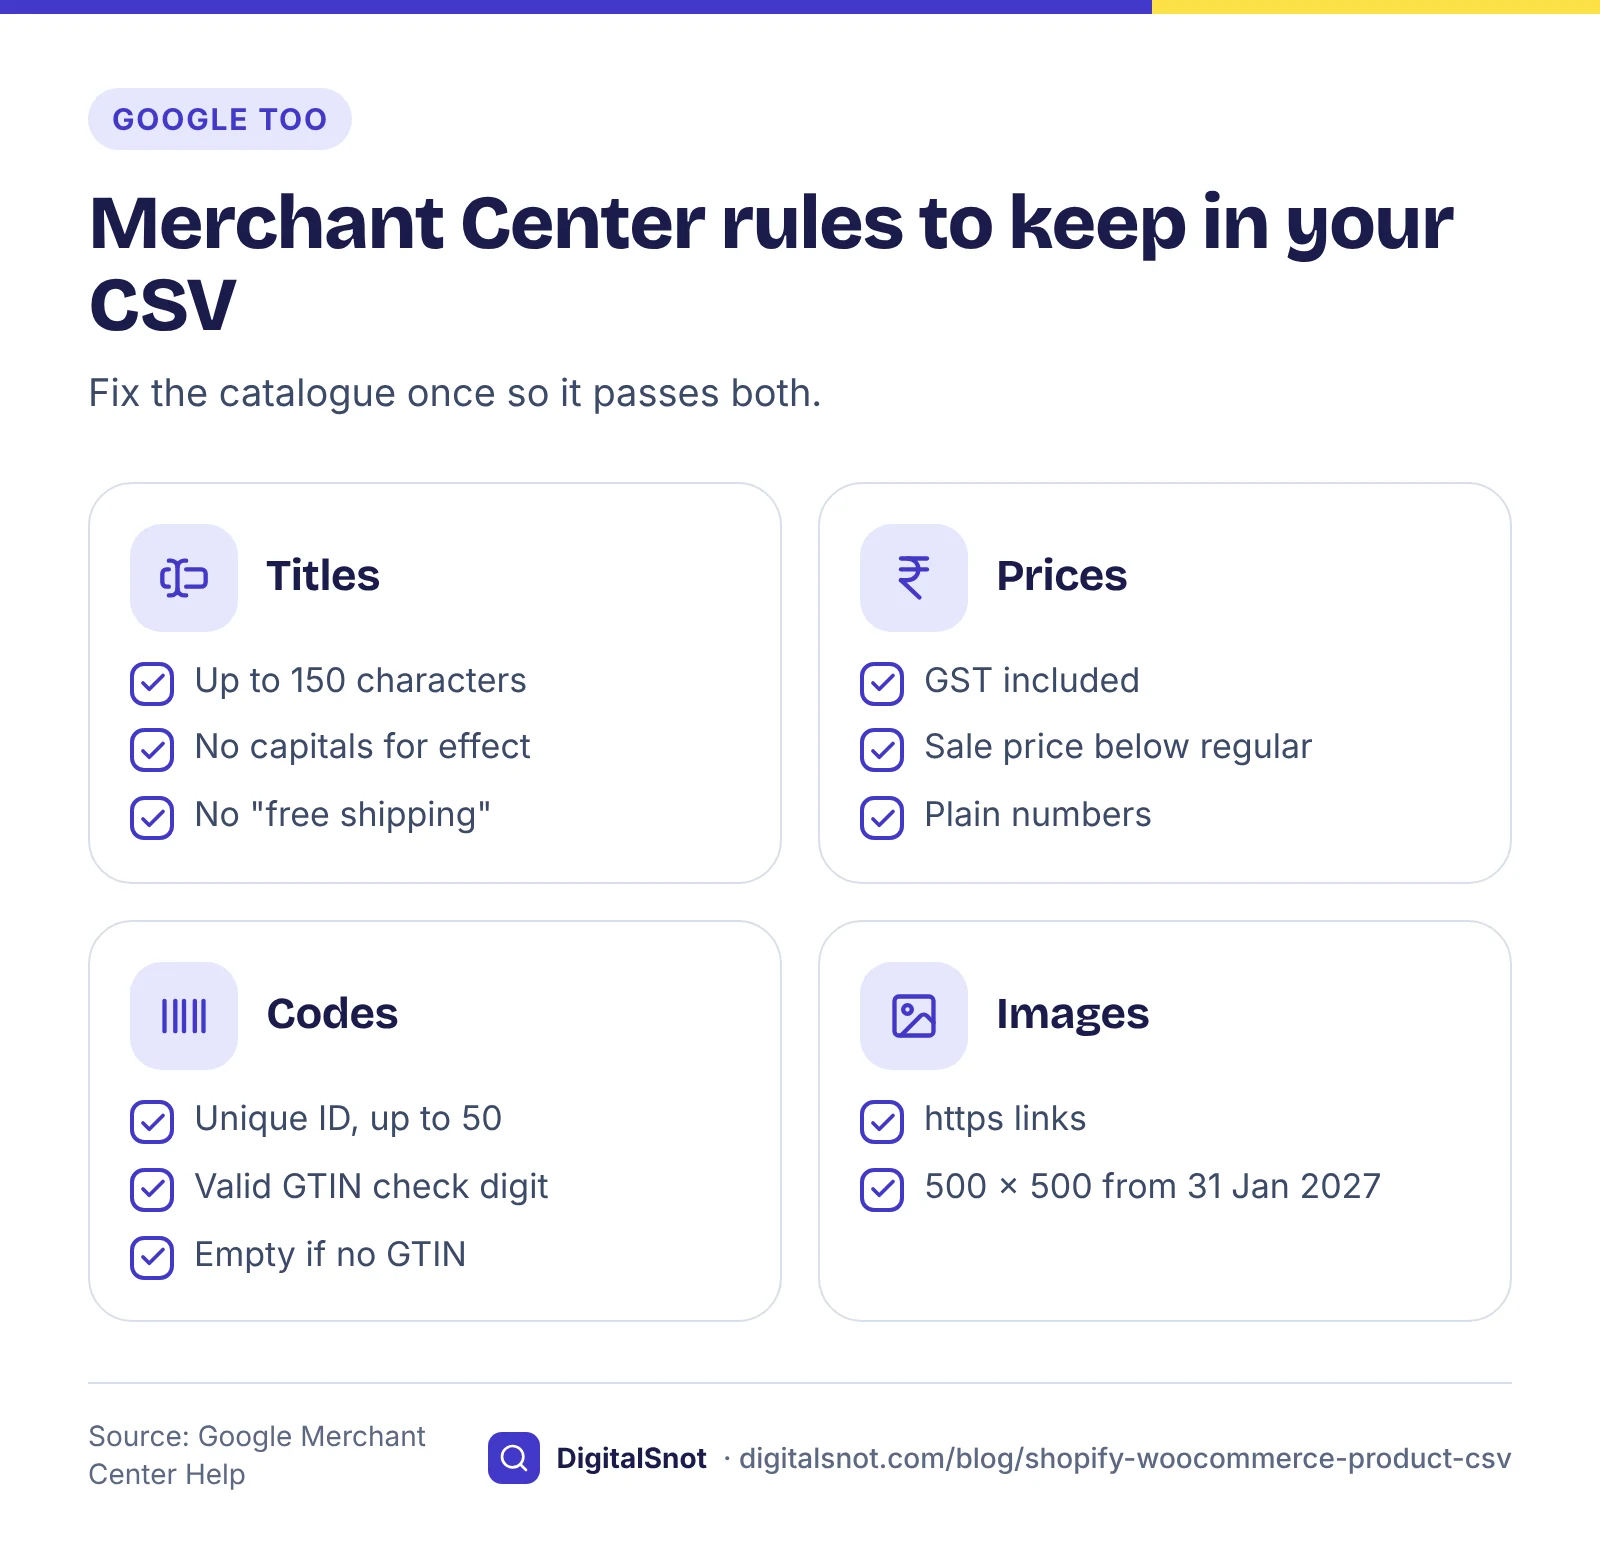
If you also show products on Google, fix the catalogue once so it passes both. Google's product data specification and its help pages set the main rules:
- Titles of up to 150 characters, according to the title attribute page, without capitals for effect or promotional text such as "free shipping".
- A unique ID of up to 50 characters for every product and variant. Your SKU usually serves.
- Sale prices lower than the regular price, or Merchant Center reports an invalid sale price. If your crossed-out price is the MRP, it must be higher than the price buyers pay.
- Prices with GST included for India, as Google's tax information page asks. The optional MRP attribute is available only in India.
- GTINs of 8, 12, 13 or 14 digits with a valid check digit, or left empty if the product has none.
- Images of at least 100 × 100 pixels, or 250 × 250 for clothing, with a 500 × 500 minimum for all products from 31 January 2027.
The Merchant Center Feed Checker reads a feed file in your browser and checks required attributes, length limits, availability values, price formats, GTIN check digits, sale prices and India's MRP and shipping rules, then offers a cleaned file with the safe fixes. Our post on fixing Merchant Center disapprovals covers what to do when products are still rejected.
Mistakes to avoid
- Importing everything on the first try. Two or three products first.
- Re-using an old sample file. Column names change; take a fresh one.
- Uploading photos from your computer by CSV. The file holds links only.
- Making up GTINs. Leave the field empty if the product has none.
- Showing an MRP that is not the real one. Our suggestion is to show only the MRP printed on the pack.
- Overwriting without a backup. Export your products before any re-import.
Your next step
Pick your three best-selling products and build a file for them in the Product CSV Builder. Import it, open each product in your shop and check its variants, prices, stock and photos. Then do the rest. Our guide to product page SEO covers what to write on the pages once they are live. All our free tools for online sellers work in your browser. If you want help moving or fixing a catalogue, get in touch.
Free tools in this article
- Product CSV Builder for Shopify and WooCommerce Turn your product list into a Shopify or WooCommerce import CSV, with variants, SKUs and checks.
- Bulk Catalogue Editor Open a product CSV, find duplicate SKUs, long titles and price errors, fix them in bulk and download it again.
- Merchant Center Feed Checker Check a product feed for missing attributes, wrong formats, bad GTINs and duplicates before you upload it.
Frequently asked questions
Which columns does a Shopify product CSV need?
Shopify's help says a new product needs only the title, plus the URL handle when it has variants; updating existing products needs both. In practice you also want the price, SKU, options, stock and photo links. Use the sample file from Shopify's current help page, because column names have changed over time.
How do I add sizes and colours as variants in a Shopify CSV?
Give the product up to 3 options, such as Size and Colour, with their values. Each combination is a variant on its own row with the same handle; the first row carries the product's details and the option names. Our Product CSV Builder writes these rows for you, with a SKU, price and stock for each variant.
How does a WooCommerce CSV link variations to their product?
The parent row has type variable and lists every attribute value. Each variation row has type variation, its own unique SKU, one value for each attribute, and the parent's SKU (or id:123) in the Parent column. If a variation is missing after the import, check its SKU is unique and its attribute values match the parent's.
Can I upload product photos with the CSV?
Not from your computer. The CSV holds links to photos that are already online, and the shop fetches them during the import. Use direct links to the image that anyone can open, starting with https://. Check each product after the import, because a photo that cannot be fetched may be skipped.
Why do my rupee signs or Hindi words look garbled after the import?
The file was probably not saved as UTF-8. Shopify's help says unexpected characters usually mean the CSV is not UTF-8, and WooCommerce asks for UTF-8 too. Save or export the file as "CSV UTF-8" and import it again.
Can I edit my whole catalogue and import it again?
Yes, with care. Export your products, edit the file, keep the columns as they are, and import a few products first. Shopify overwrites matching handles only if you choose to, and clears values in blank columns on a re-import; WooCommerce updates products that match by ID or SKU. Keep a copy of the original export.
Sources
Every figure and claim in this article comes from the sources below. We checked each one when writing and link to the original so you can read it yourself. Credit belongs to the authors and publishers listed. How we write and check our articles.
-
1
Using CSV files to import and export products
Shopify Help Center · Title required for new products, URL handle when adding variants; handle rules; up to 3 options; current column names.
-
2
Importing products with a CSV file
Shopify Help Center · A product CSV of up to 15 MB; overwriting or skipping products with matching handles.
-
3
Common import issues
Shopify Help Center · UTF-8 encoding and image links that must be public, direct links.
-
4
Product CSV Importer and Exporter
WooCommerce · Variation rows, the Parent column, comma-separated image links, UTF-8, updating by ID or SKU, and a trial import first.
-
5
Product CSV Import Schema
WooCommerce (GitHub wiki) · The columns of the built-in importer.
-
6
Product data specification
Google Merchant Center Help · Required attributes and limits, including an id of up to 50 characters.
-
7
Title [title]
Google Merchant Center Help · Titles of up to 150 characters, without promotional text or capitals for effect.
-
8
How to fix: Invalid sale price
Google Merchant Center Help · The sale price must be lower than the regular price.
-
9
About tax information for your products
Google Merchant Center Help · Include GST in the price outside the United States and Canada.
-
10
Maximum retail price [maximum_retail_price]
Google Merchant Center Help · An optional MRP attribute, available only in India.
-
11
Merchant Center product data specification update 2026
Google Merchant Center Help · A 500 by 500 pixel image minimum for all products from 31 January 2027.
Want a second pair of eyes?
Tell us about your site. We reply within one business day.
Talk to us Try our free tools